What’s Inside
- Ditch the Floor Dresser for Wall-Mounted Storage Systems
- Choose the Badger Basket Changing Table for Triple Duty
- Maximize Under-Crib Real Estate with Low-Profile Storage
- Install Floor-to-Ceiling Built-Ins for Maximum Storage
- Switch to a Mini Crib and Reclaim Your Floor Space
- Create Functional Zones Across Multiple Rooms
- Use Corner Bookshelves to Define Play Zones
- Position Your Changing Station in the Master Bedroom
- Paint Three Walls Neutral with One Muted Accent Wall
- Incorporate Biophilic Design with Plants and Nature Murals
- Choose Convertible Furniture as Your Default
- Use Sustainable Materials Throughout Your Design
- Maximize Natural Light with Sheer Curtains
- Design for Flexibility, Not Instagram Perfection
- Avoid Bright Colors That Overstimulate Small Spaces
- Create a Compact Feeding Station with Everything Within Reach
- Use Mirrors to Visually Expand Your Space
- Incorporate Vertical Storage for Books and Toys
- Choose a Compact Glider with Hidden Storage
- Add Personal Touches at Adult Eye Level
When I tried squeezing a full-size crib, dresser, and glider into our 8×10 spare bedroom, it was a disaster. Most small nursery ideas online assume you have more space than a closet. After rearranging furniture three times in one week and nearly losing it over blocked outlets, I learned that smart design beats square footage every time.
Here’s what actually works when you’re designing a nursery in a tiny room.
Ditch the Floor Dresser for Wall-Mounted Storage Systems
I got rid of our bulky dresser and installed wall-mounted rods with hooks and netted bags. This freed up nearly 12 square feet of floor space, which felt like doubling the room size. The netted bags hold diapers, burp cloths, and other essentials, while the hooks keep sleep sacks and swaddles within reach during those bleary-eyed 3 a.m. changes.
Wall storage is perfect for nurseries under 100 square feet. I installed mine at 36 inches high so I could grab things easily while holding the baby. The setup cost about $40 at Target (two tension rods, four S-hooks, and three mesh organizers), which is way cheaper than any dresser.
Pro tip: Install the rods into wall studs, not just drywall. My first attempt pulled out of the wall at 2 a.m. with a crash that woke everyone.
Choose the Badger Basket Changing Table for Triple Duty

Most changing tables are useless after 18 months. I went with the Badger Basket changing table (available at Walmart for around $80-120), and it’s one of the best purchases I made. It combines a changing area, built-in laundry hamper, and three storage drawers in one compact piece.
The changing pad sits on top, the hamper pulls out from the side for dirty clothes, and the drawers hold diapers, wipes, and creams. When my daughter outgrew diaper changes, I removed the pad and repurposed the top for decorative storage baskets filled with hair accessories and small toys. The drawers now hold art supplies.
It’s only 32 inches wide, so it fits almost anywhere without taking over the room. The hamper feature alone was worth it—no more tripping over dirty onesies.
Maximize Under-Crib Real Estate with Low-Profile Storage
The space under your crib is prime storage that most people waste. I use low-profile bins (6-8 inches tall) to store backup blankets, crib sheets, burp cloths, towels, and board books. This keeps everything accessible without adding to the room’s footprint.
If you’re buying a new crib, consider models with built-in drawers underneath. The IKEA Stuva crib system includes three large drawers, but it’s $400-500. I went cheaper with a standard mini crib and added four fabric bins from The Container Store for around $60.
Common mistake: Don’t use tall storage containers under the crib. Anything over 8 inches high is impossible to access without moving the crib. I learned this the hard way and ended up with bins I couldn’t reach for six months.

Criusia Drawer Organizer Clothes
A dependable everyday pick — Criusia Drawer Organizer Clothes pulls in 1 ratings at 4.5 stars. Not flashy, just solid.
Install Floor-to-Ceiling Built-Ins for Maximum Storage

If you own your home, floor-to-ceiling built-ins are worth the investment. We hired a local carpenter to install a custom unit along one 8-foot wall, combining open shelving at the top for decor and closed cabinets at the bottom for toys. The project cost about $1,200, but it solved our storage problem permanently.
Mixed storage works best. All open shelves look cluttered quickly, while all closed storage feels dark and cramped. The open sections display stuffed animals and photo frames, while the closed cabinets hide toy chaos.
The bottom shelves are 24 inches high so my daughter can reach her books and toys now that she’s a toddler. Built-ins eliminated the need for a separate bookshelf, toy chest, and storage cabinet, saving floor space.
Switch to a Mini Crib and Reclaim Your Floor Space
Standard cribs are 52 inches long and take up a lot of room. Mini cribs are only 38 inches long and cost less—typically $200-400 versus $400-800+ for full-size models. I used a mini crib for both my kids, and neither outgrew it before transitioning to a toddler bed around age two.
The size difference matters more than you’d think in a small nursery. That extra 14 inches of floor space allowed me to fit a glider chair in the room, which wouldn’t have worked with a full-size crib. The narrower width also meant I could position the crib against the wall without blocking the closet door.
Honestly, the “babies need full-size cribs” advice is outdated. Most kids transition out of cribs by age two, and very few actually grow long enough to need those extra inches. The DaVinci Kalani mini crib converts to a twin bed later, so you’re not sacrificing longevity. I found mine on sale at Amazon for $180, and it’s still sturdy after four years.
Create Functional Zones Across Multiple Rooms

You don’t need one dedicated nursery. I split baby zones across three spaces in our 1,100-square-foot home, and it worked better than cramming everything into one tiny room. Our master bedroom housed the bassinet and changing station for nighttime convenience. The spare bedroom held the crib and nursing chair for naps and bedtime. A corner of our living room became the play and reading zone with a small bookshelf and toy basket.
This multi-room approach works well in smaller homes where a dedicated nursery isn’t realistic. The changing station in our bedroom meant I wasn’t stumbling down the hallway for 2 a.m. diaper changes. The living room play corner kept toys contained but accessible during the day.
The key is designating clear purposes for each zone. I kept a small caddy with diapers, wipes, and cream in both the master bedroom and spare room. The duplicate supplies cost maybe $30 but saved me countless trips up and down stairs.

Criusia Over the Door Organizer
If you want something that just works, Criusia Over the Door Organizer is a safe bet (205 reviews, 4.5 stars).
Use Corner Bookshelves to Define Play Zones

A petite corner bookshelf creates a visual anchor for your play area without requiring walls or bulky room dividers. I placed a 3-tier corner shelf (about 30 inches tall) in our living room corner, and it immediately defined that space as the baby zone. The shelves hold board books on top, blocks and stacking toys in the middle, and stuffed animals in a basket on the bottom.
Corner shelves work because they use otherwise wasted space and don’t protrude into the room like standard bookshelves. The one I bought from Target cost $45 and fits perfectly in the 90-degree angle where two walls meet. It’s also low enough that my daughter could reach her own books by 14 months, which encouraged independent play.
This setup works equally well in a bedroom corner if you’re keeping everything in one room. The shelf creates a clear boundary between the sleeping area and play area, which helps with the mental separation between naptime and playtime. I added a small foam mat in front of the shelf to define the play zone further and provide cushioning for tumbles.
Position Your Changing Station in the Master Bedroom

Most people put the changing table in the nursery, but I put ours in the master bedroom near my dresser. This made nighttime diaper changes infinitely easier during those first six months when my son woke up every three hours. I could change him, feed him, and get back to sleep without leaving our bedroom.
The setup also streamlined our morning routine. I’d change his diaper, get him dressed, and then get myself ready, all within a 10-foot radius. No running between rooms while he’s crying or I’m half-dressed. The changing pad sat on top of my dresser (secured with a non-slip mat underneath), and I used the top two dresser drawers for his clothes and diaper supplies.
After he outgrew diaper changes, I removed the pad and reclaimed my dresser top. The whole arrangement cost me nothing extra since I already owned the dresser. If you don’t have space on your dresser, a wall-mounted fold-down changing table works well in tight quarters.
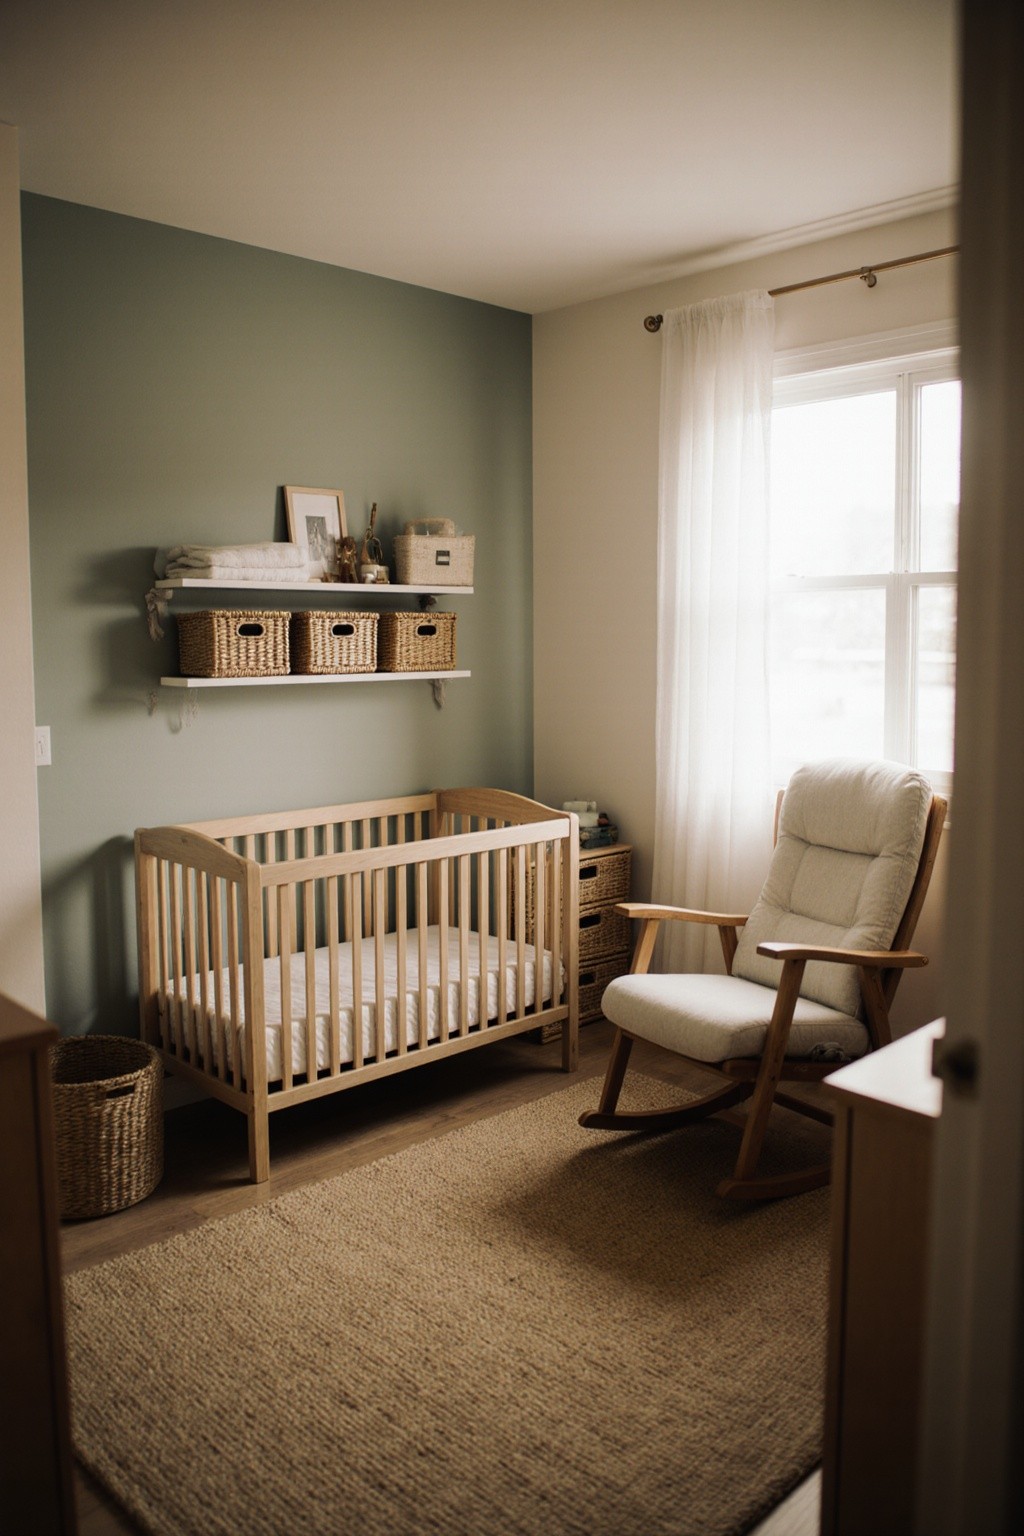
Paint Three Walls Neutral with One Muted Accent Wall

Soft neutrals with one accent wall in muted forest green or terracotta are trending. I painted three walls in our nursery a warm cream (Benjamin Moore’s “White Dove”) and one accent wall in dusty sage green (“Saybrook Sage”). This adds visual depth without overwhelming a small space.
Earthy palettes like muted greens, soft browns, creams, and warm pastels create a soothing environment that helps with sleep. These colors also pair naturally with wooden furniture and woven textiles, so your design feels cohesive without much effort.
I spent about $80 on paint for our 9×11 room (one gallon of each color) and did the work myself over a weekend. The single accent wall gives the room personality without the commitment of painting the entire space in a color you might tire of. If you’re renting, removable wallpaper in nature-inspired patterns achieves the same effect without risking your security deposit.

DIMJ Drawer Organizer Clothes, 12 Pack Dresser Organizer
If you want something that just works, DIMJ Drawer Organizer Clothes is a safe bet (13 reviews, 4.5 stars).
Incorporate Biophilic Design with Plants and Nature Murals

Bringing nature indoors is calming for babies and parents. I added a large botanical print above the crib (secured properly to the wall, not hanging over the crib itself), a forest-themed wall decal on one wall, and two non-toxic plants on a high shelf completely out of reach. The spider plant and pothos are both safe if touched and nearly impossible to kill.
The nature elements give my daughter something interesting to focus on during tummy time and diaper changes. I also installed a ceiling decal of tree branches and leaves, which she’d stare at for 10-15 minutes during those early months. That ceiling focal point bought me enough time to fold laundry or drink coffee while she was content on her play mat.
Pro tip: Skip the expensive custom murals. I used peel-and-stick wall decals from Etsy that cost $35 and took 20 minutes to apply. They look hand-painted but remove cleanly when we’re ready for a change. The plants were $12 each from Home Depot, and they’ve thrived in the indirect natural light from our window.
Choose Convertible Furniture as Your Default

Every piece of furniture in a small nursery should serve multiple purposes or convert as your child grows. I bought a convertible crib that transforms into a toddler bed and eventually a daybed (the Graco Benton model, around $250). The changing table doubles as a dresser. The glider chair has a matching ottoman that provides hidden storage inside.
This approach reduces waste and ensures your investment adapts over time. My daughter is now three, and we’re still using the same crib converted to a toddler bed, the same dresser for her clothes, and the same chair for bedtime stories. I’ve spent maybe $600 total on nursery furniture over three years instead of buying new pieces every 18 months.
Look for cribs with conversion kits included (some charge extra, which is annoying), changing tables with removable toppers, and chairs with washable covers. The upfront cost might be slightly higher, but the per-year cost is dramatically lower than buying disposable baby furniture.
Use Sustainable Materials Throughout Your Design

I switched to organic cotton bedding, zero-VOC paint (Benjamin Moore Natura line), and furniture made from responsibly sourced wood. The health benefits matter, especially in a small room where air circulation is limited. Traditional paints and synthetic materials off-gas chemicals that concentrate in enclosed spaces, and babies spend 14-16 hours per day in their nursery during the first year.
I also incorporated woven baskets for storage (seagrass bins from Target, about $15-25 each), a jute rug that adds texture without synthetic fibers, and wooden toys instead of plastic. These natural materials enhance the room’s aesthetic while creating a healthier environment. The woven textures also add visual interest and warmth that makes the small space feel intentionally designed rather than cramped.
The sustainable approach costs slightly more upfront. Organic crib sheets run $30-40 versus $15-20 for conventional ones. But the zero-VOC paint didn’t smell at all, so I could use the room immediately instead of airing it out for days. That alone was worth the extra $10 per gallon when I was nine months pregnant and desperate to finish nesting.

Delta Children Nursery Storage 48 Piece Set
If you want something that just works, Delta Children Nursery Storage 48 Piece Set – Easy Storage/Organizatio is a safe bet (17 reviews, 4.5 stars).
Maximize Natural Light with Sheer Curtains

Natural light supports your baby’s circadian rhythm development from birth, which directly impacts sleep patterns. I hung sheer curtains that allow diffused natural light during the day while protecting from harsh direct sun. The curtains filter about 50% of the light, so the room stays bright enough to regulate wake cycles but not so bright that it’s uncomfortable for naps.
I layered the sheers with blackout curtains on a double rod system. During naps and nighttime, I close the blackout curtains completely. During morning wake-up and daytime play, I open the blackout curtains and leave just the sheers. This flexibility matters more than I expected because babies are incredibly sensitive to light cues.
The double rod setup cost about $60 from Amazon (one tension rod for sheers, one for blackout curtains), and the curtains themselves were another $50 total. Small nurseries often have small windows, which actually makes window treatments cheaper. Our window is only 36 inches wide, so I needed less fabric than standard window sizes require.
Design for Flexibility, Not Instagram Perfection

Don’t over-design before baby arrives. I spent hours arranging our changing station, diaper pail, and bassinet in aesthetically pleasing positions, and literally everything moved within the first week. The bassinet that looked beautiful next to the dresser in photos ended up at my bedside for easier nighttime feedings. The changing pad traveled throughout the house depending on where the baby fell asleep. The carefully styled bookshelf became a dumping ground for burp cloths and pacifiers.
Design for flexibility instead of fixed layouts. Use furniture on wheels when possible (our changing cart has casters), choose lightweight pieces you can move easily, and accept that your daily rhythm will dictate the actual layout. The beautiful nursery photos online show spaces that don’t reflect real life with a newborn.
I wish I’d spent less time on styling and more time thinking about workflow. Where will you stand during diaper changes? Can you reach wipes without letting go of the baby? Is the diaper pail close enough to the changing table that you’re not walking across the room with a dirty diaper? These practical questions matter more than whether your color scheme is cohesive.
Avoid Bright Colors That Overstimulate Small Spaces
Bold primary colors create visual chaos in small spaces. Bright red, electric blue, and sunshine yellow might seem cheerful, but they’re genuinely overstimulating for babies and make small rooms feel even more cramped. I initially painted one wall bright yellow, and it was so visually overwhelming that I repainted it within three months.
Modern design prioritizes calming, muted tones that make rooms feel larger and more restful for both baby and parents. Soft sage, dusty rose, warm taupe, and creamy white all create a soothing environment that supports sleep. These colors also photograph better in natural light, which matters if you’re documenting these early months.
The shift to muted palettes isn’t just aesthetic. Studies show that high-contrast, bright colors can increase cortisol levels and make it harder for babies to settle. The softer tones create a cocoon-like feeling that helps everyone relax. Plus, you won’t tire of looking at muted colors the way you might with bold ones after staring at them for months during nighttime feedings.

Beautiful Wooden Baby Closet Dividers Set of 7
Beautiful Wooden Baby Closet Dividers Set of 7 – Double-Sided Organize has been one of the most consistently praised picks in this category. 11 reviewers averaged 4.5/5.
Create a Compact Feeding Station with Everything Within Reach
I set up a feeding station next to my glider chair with everything I needed within arm’s reach: water bottle, snacks, phone charger, burp cloths, nursing pillow, and a small basket for pacifiers and nail clippers. This setup eliminated the need to get up mid-feeding, which matters when you’re nursing 8-12 times per day in the early weeks.
The station itself is just a small side table (16 inches square) from IKEA that cost $20. I added a two-tier lazy Susan on top to maximize the surface area, which holds my water bottle on the top tier and snacks on the bottom tier. A small wall-mounted shelf above the table holds extra supplies that I restock weekly.
This compact feeding station saved my sanity during those marathon nursing sessions. I could grab everything I needed without standing up, which meant my daughter stayed latched and content instead of breaking her latch and getting frustrated. The setup takes up maybe 2 square feet of floor space but provides probably 5 square feet worth of storage and functionality.
Use Mirrors to Visually Expand Your Space

I hung a large mirror (36 inches tall) on the wall opposite our window, and it genuinely makes the room feel twice as large. The mirror reflects natural light throughout the space and creates the illusion of depth. I positioned it at adult eye level so it’s useful for me while getting ready but high enough that my daughter can’t reach it or pull it down.
Mirrors also provide entertainment for babies. Around 4-6 months, my daughter became fascinated with her reflection and would “talk” to herself in the mirror during tummy time. I placed a smaller safety mirror (acrylic, not glass) at floor level propped against the wall for this purpose. The $15 mirror from Amazon provided 20-30 minutes of daily entertainment during that phase.
Common mistake: Don’t hang mirrors directly over the crib or changing table where they could fall. I mounted ours with heavy-duty wall anchors rated for 50 pounds, even though the mirror only weighs 10 pounds. The extra security matters when you’re talking about something hanging above where your baby spends time.
Incorporate Vertical Storage for Books and Toys

Vertical storage is your best friend in small nurseries. I installed three floating shelves at different heights (24 inches, 40 inches, and 56 inches from the floor) to store books, small toys, and decorative items. The staggered heights create visual interest and make the wall feel intentionally designed rather than cluttered.
The lowest shelf holds board books that my daughter can reach herself. The middle shelf displays stuffed animals and wooden toys in small baskets. The top shelf holds items I want visible but not accessible (breakable decorations, photos in frames, backup supplies). This arrangement keeps everything organized and off the floor without requiring any floor space.
I used picture ledge shelves from IKEA (the Mosslanda line, about $10 each) because they have a small lip that prevents books from sliding off. Each shelf is only 4 inches deep, so they don’t protrude far into the room. The three shelves cost $30 total and hold probably $500 worth of books and toys that would otherwise be piled on the floor or stuffed in bins.
Choose a Compact Glider with Hidden Storage
Standard glider chairs are massive and eat up valuable floor space. I chose a compact glider (32 inches wide instead of the typical 36-38 inches) with a matching storage ottoman. The ottoman opens to reveal hidden storage where I keep extra blankets, burp cloths, and nursing supplies. This combination provides seating, gliding motion for soothing, and storage in a footprint of about 6 square feet.
The glider I bought (Delta Children Emerson, around $220 on Amazon) fits perfectly in the corner of our nursery without blocking the closet door. The storage ottoman was an additional $80 but worth every penny for the hidden storage. I can fit probably 20 receiving blankets, 30 burp cloths, and miscellaneous baby items inside.
Pro tip: Measure your doorways before ordering furniture. I almost bought a glider that wouldn’t fit through our 30-inch bedroom door. The compact models are easier to maneuver through tight spaces and up stairs if your nursery is on the second floor. They’re also easier to move between rooms if you decide to relocate the feeding station later.
Add Personal Touches at Adult Eye Level

Small nurseries still need personality, but I learned to add personal touches at adult eye level rather than cluttering surfaces. I hung a gallery wall of family photos above the changing table where I’d see them during diaper changes. I added a meaningful quote decal on the wall behind the glider where I’d read it during nighttime feedings. I displayed a few special items on the top floating shelf.
This approach keeps surfaces clear for functional use while making the room feel personal and intentional. The changing table top stays empty except for the changing pad and immediate supplies. The dresser top holds only a white noise machine and small lamp. The floor stays clear except for furniture and the play mat.
The gallery wall cost about $40 for frames from Target, and I printed photos at Walgreens for $0.30 each. The quote decal was $15 from Etsy. These small personal touches make the room feel like ours without adding clutter or taking up precious storage space. They also give me something positive to focus on during those challenging middle-of-the-night moments when everything feels hard.
These layout small nursery ideas work because they prioritize function over form while still creating a beautiful space. Start with the furniture pieces you absolutely need, add storage vertically instead of horizontally, and design for flexibility as your needs change. Save this article for when you’re ready to set up your own small nursery, and remember that the best layout is the one that actually works for your daily life, not the one that looks perfect in photos.
Frequently Asked Questions
What is the smallest size for a functional nursery?
A functional nursery can work in spaces as small as 6×8 feet (48 square feet). Use a mini crib, wall-mounted storage, and under-crib bins to maximize the space. Many parents successfully create multi-room nursery zones instead of one dedicated room.
Should I use a mini crib or full-size crib in a small nursery?
Choose a mini crib for small nurseries. They’re 38 inches long versus 52 inches for standard cribs, cost $200-400 less, and most children transition to toddler beds by age two before outgrowing the smaller size anyway.
How do I create a nursery layout in a multi-purpose room?
Use corner shelving to define the baby zone, add a compact glider that doubles as regular seating, and incorporate hidden storage in ottomans or under-crib bins. Keep baby items in decorative baskets that blend with your existing decor.
What furniture is essential for a small nursery layout?
Essential pieces are a crib (preferably mini), changing surface (can be a pad on your dresser), and comfortable seating for feeding. Skip standalone dressers and toy boxes by using wall-mounted storage and under-crib bins instead.